
JavaScript SDK
v1.19.906
Dependencies and file loading order
The PRSONAS JavaScript SDK is designed to run exclusively on the PRSONAS Viewer application (PRSONAS_VIEWER.exe). Currently, the SDK is made up of 3 modules: SDK, App and Avatar. The SDK module provides the base functionality that all the other modules depend upon and must be loaded first. The App module must be loaded BEFORE the Avatar module since the latter is dependent on it.
A typical HTML include sequence would look similar to this:
    <script src="prsonas-sdk.js"></script>
    <script src="prsonas-app.js"></script>
    <script src="prsonas-avatar.js"></script>
The SDK is coded in plain vanilla JavaScript and does not require any external dependencies.
Globals
When the HTML page is loaded there will be a global variable for each of the modules that have been included. These variables are fully qualified with the “com.prsonas” namespace:
- com.prsonas.sdk – SDK module
- com.prsonas.sdk.app – App module
- com.prsonas.sdk.avatar – Avatar module.
Here is a JavaScript/jQuery example of using these variables:
   $(function(){
      let avatar = com.prsonas.sdk.avatar;
      let languages = avatar.getSupportedLanguages().data;
      for(let index = 0; index < languages.length; index++)    {
         console.log(languages[index]);
      }
   });
Events
The PRSONAS SDK utilizes the publish-subscribe pattern for handling events. Clients can subscribe to an event with a method that will be called when an event is raised. Events are module specific and are defined in the “eventTypes” property. Below is an example of registering a callback that will be invoked when the Avatar recognizes a spoken phrase via the microphone:
   function handlePhrase(e){
      if (e === null) return;
      console.log("Phrase recognized:", e);
   }

   com.prsonas.sdk.subscribe(com.prsonas.sdk.avatar.eventTypes.PHRASE_RECOGNIZED, handlePhrase);
Unsubscribing from an event follows a similar pattern using the unsubscribe method:
com.prsonas.sdk.unsubscribe(com.prsonas.sdk.avatar.eventTypes.PHRASE_RECOGNIZED, handlePhrase);
Data passed into event handlers have the following structure:
   {
      "module":"<the module raising event>",
      "type": "<the name of the event>",
      "value": "<the overall value of the operation>",
      "properties":"<an object containing additional data for the event>"
    }
For example, an event object for a recognized phrase will look like this:
   {
      "module": "AVATAR",
      "type": "PHRASE-RECOGNIZED",
      "value": "Where can I park my car?",
      "properties": {
         "ANSWER": {
            "text": "Parking",
            "metadata": {
               "system_metadata_qna_edited_manually": "true",
               "action": "location_parking",
               "confidence": "0.9153"
            }
         }
      }
   }
Note: Events are handled asynchronously on separate threads. Be sure to reference the global entry
points (i.e. com.prsonas.sdk, com.prsonas.avatar etc.) in the callback handler.
PRSONAS Startup Sequence
A typical PRSONAS deployment is made of up of three components:
- PRSONAS_AVATAR.exe – This application displays the PRSONAS character (Avatar) and responds to
events sent to it from the Viewer application. - PRSONAS_VIEWER.exe – The Viewer is responsible for displaying the project specific content
(Experience) and facilitates communication between the Avatar and the HTML based Experience.
The Viewer supports transparency and is most frequently used as an overlay over the Avatar. - Experience – The Experience is the HTML based content displayed in the Viewer application.
The Experience is the primary integration point for PRSONAS clients.
Below is a process diagram that illustrates the PRSONAS startup sequence:
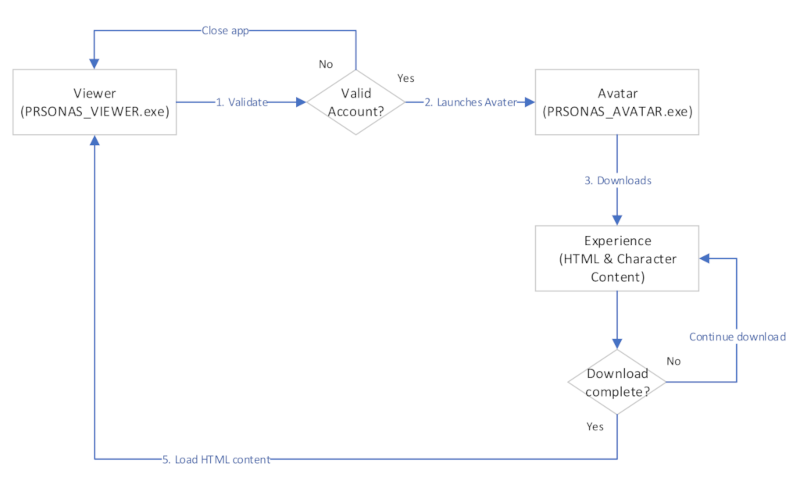
The PRSONAS_VIEWER.exe (Viewer) is the first application that is started and as such requires a valid username, password and experience supplied by PRSONAS. During startup, the Viewer looks for the account username, password and experience in the following order:
- Username, password and experience command line parameters.
- Username, password and experience properties set in the PRSONAS_VIEWER.exe.config file. (NOT RECOMMENDED).
- _prsonas_username, _prsonas_password and _prsonas_experience environment variables. (Preferred means of storing credentials).
- Cached credentials saved from the interactive login screen.
If the Viewer does not find credentials in the above locations it will present a login screen:
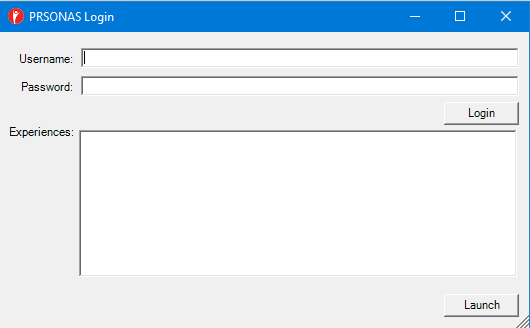
Enter the username and password in the supplied fields and click on “Login”. If the credentials are valid then a list of available experiences will be displayed in the “Experiences” list box:
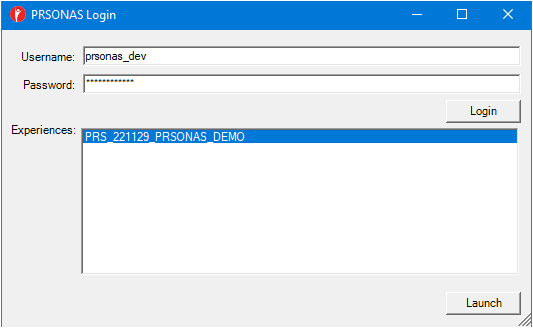
Selecting an experience and clicking the “Launch” button will initiate the loading sequence. Credentials will be stored in an encrypted cache and will automatically be loaded the next time the Viewer is executed so the login screen is only displayed once. To reset credentials use set the clearAuthCache command line parameter to Y. See the “Viewer Command Line Options” section below for more details.
Viewer Specific Command Line Options
The PRSONAS_VIEWER.exe supports the following command line parameters:
clearauthcache=Set to 'Y' to clear the authorization cache file.

experience=The experience to load after logging in.

forcefocus=If set to 'N' the browser will NOT attempt to capture focus.

height=The height of the browser window in pixels

help=Displays this help menu.

left=The left of the browser window in pixels

minimized=If set to 'Y' the browser will start minimized.

password=Password to authenticate against.

server=Set to determine which content folder server to use. Values are Staging or Live.

settings_profile=Name of the settings profile to be applied at startup.

top=The top of the browser window in pixels

url=The URL of the site the browser will display

username=Username to authenticate against.

webroot=The root folder for the internal web server.

width=The width of the browser window in pixels
Below is a typical set of command line parameters (usually saved to a batch file):
@ECHO OFF
PRSONAS_VIEWER.EXE url=http://127.0.0.1:8080/index.html top=0 left=0 height=1920 width=1080 forcefocus=Y username=fakeuser password=fakepassword experience=fake_experience
Avatar Specific Command Line Options
Additional command line parameters can be added to the viewer which are passed directly to the Avatar. Here are the PRSONAS_AVATAR.exe command line parameters:
cache_expire_after=#, where # = number of days. All content will be removed from local cache and online content server that is older than number of days.
Below is a typical set of command line parameters (usually saved to a batch file):
@ECHO OFF
PRSONAS_VIEWER.EXE url=http://127.0.0.1:8080/index.html top=0 left=0 height=1920 width=1080 forcefocus=Y username=fakeuser password=fakepassword experience=fake_experience
Remote Procedure Call (RPC) Support
The PRSONAS_VIEWER.exe has full RPC support. This feature allows 3rd party applications to integrate with a PRSONAS deployment without having to rely on the JavaScript SDK shipped with the DXP. Common RPC use cases involve
software that cannot be run inside the Viewer because of custom hardware integrations. In these scenarios the Viewer usually runs minimized and acts as a command "bridge" to the DXP.
The diagram below shows the RPC data flow:
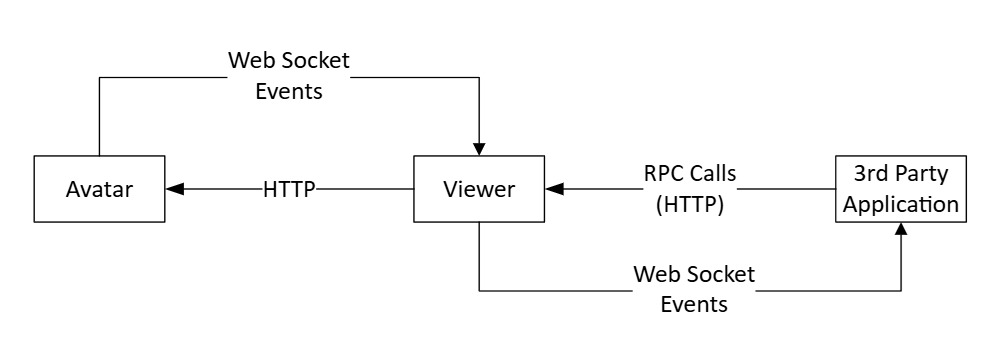
In RPC mode the 3rd party application connects to the Viewer as a web socket client which will in-turn receive forwarded events from the Avatar. Applications interact with the Avatar by sending HTTP POST command to the Viewer.
Making a Remote Procedure Call
The RPC protocol is based on string representations of JavaScript method calls on global objects in the SDK. The command string is embedded in a command object which is then sent to the Viewer:
   {
      "command": "<JavaScript to call a method on a fully qualified object>"
   }
Calls to the Viewer are made using the POST HTTP verb. The URL is http://[WebServerIp]:[WebServerPort]/rpc where WebServerIp and WebServerPort are settings found in the PRSONAS_VIEWER.exe.config file. The defaults for these are 127.0.0.1 and 8080 respectively so the default RPC URL is http://127.0.0.1:8080/rpc. The example below demonstrates making an RPC call using jQuery to populate an HTML selection list of all the languages supported by the DXP:
   let command = {'command':'com.prsonas.sdk.app.getSupportedLanguages()'};

    $.ajax
    ({
        type: "POST",
        url: '127.0.0.1:8080/rpc',
        dataType: 'json',
        data: command,
        contentType: 'application/json; charset=utf-8'
    }).done(function(response){

        if(!response.Success){
            console.log('Error processing request', response.Message);
            return;
        }

        let selection = "";
        let data = response.Result.data;

        for (let langIdx = 0; langIdx < data.length; langIdx++) {
            selection += "<option value='" + data[langIdx] + "'>" + data[langIdx] + "</option>";
        }
        $('#languageSelection').html("<select name='srcTransLangSel' id='srcTransLangSel'>" + selection + "</select>");
	})
    .fail(function(error){
		console.log('HTTP error:', error);
	});
RPC calls return objects that consist of Message, Result and Success properties:
   {
      "Message": "<contains text of any error messages; blank if there are no errors>",
      "Success": "<true or false if an error occurred>",
      "Result": "<the result of the operation; null if an error occurred>"
   }
Receiving events
In order to receive events external applications need to connect to the Viewer's web socket server address at [ServerWebSocketUrl]/Broadcast using ServerWebSocketUrl setting found in the PRSONAS_VIEWER.exe.config file. The default value for ServerWebSocketUrl is ws://127.0.0.1:8989 so the default web socket URL is ws://127.0.0.1:8989/Broadcast.
Below is a JavaScript example of setting up a web socket using the default WS URL:
let socket = new WebSocket("ws://127.0.0.1:8989/Broadcast");
socket.onmessage = function(data){
  console.log('Inbound data: ', data.e);
}
Web socket event objects consist of type and value properties:
{
    "type": "WEBSOCKET-BROADCAST",
    "value": {}
}
Currently, the type property is always set to "WEBSOCKET-BROADCAST" though additional types may be added in the future. Below is an example of an event object sent from the Avatar in
response to a WalkUp command:
{
    "type": "WEBSOCKET-BROADCAST",
    "value": {
        "module": "ACTION",
        "type": "CC",
        "value": "WALKUP_01_ENGLISH",
        "properties": {
            "copy": "Welcome. I'm Daphne, your iHealth Assist Concierge. How may I assist you today?"
        }
    }
}
Some RPC commands are executed asynchronously and will return their values using a web socket event. These methods are marked with the async prefix in the documentation. When using the JavaScript SDK directly these methods require a callback parameter which will be executed when the data becomes available. When making an RPC call to these methods
a unique identifier is passed in instead of the callback. Below is an example of an async RPC call:
   let id = 'c0e72fef-2b84-4331-b6c4-a3531de9a4da';
   let command = {'command':'com.prsonas.sdk.app.getWindowRect("' + id + '")'};

    $.ajax
    ({
        type: "POST",
        url: '127.0.0.1:8080/rpc',
        dataType: 'json',
        data: command,
        contentType: 'application/json; charset=utf-8'
    }).done(function(response){

		if(!response.Success){
			console.log('Error processing request', response.Message);
			return;
		}

		console.log('getWindowRect()', response);
	})
    .fail(function(error){
		console.log('HTTP error:', error);
	});
When the data becomes available an event with the same ID will be broadcast over the web socket:
{
    "type": "WEBSOCKET-BROADCAST",
    "value": {
        "left": "0",
        "top": "0",
        "width": "1920",
        "height": "1080",
        "id": "c0e72fef-2b84-4331-b6c4-a3531de9a4da"
    }
}
Avatar Communications Protocol
This section details the low-level communications protocol used by PRSONAS_AVATAR and PRSONAS_VIEWER for clients that need to integrate with the Avatar without the Viewer.
Sending Commands to the Avatar
The diagram below shows the inter-process communication between the Avatar and a 3rd party application:
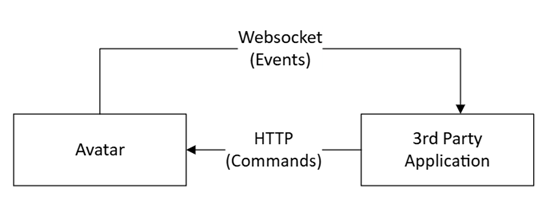
Sending Commands to the Avatar
The PRSONAS_AVATAR.exe uses a simple string based command structure that utilizes the HTTP GET Verb:
http://[IP ADDRESS]:[PORT]/[COMMAND]/
The [IP ADDRESS] and [PORT] default to 127.0.0.1 and 5553 respectively. The [COMMAND] adheres to the following structure:
Querying data:
sendKey/[COMMAND NAME]
Some commands have several sub-settings that can be queried individually (the CAMERA settings being one)
sendKey/[COMMAND NAME]=[SUB COMMAND NAME]
Sending data:
sendKey/[COMMAND NAME]=[VALUE 1], [VALUE 2]...[VALUE N]
Sub-settings follow a similar pattern but use a colon to indicate the start of the parameter list:
sendKey/[COMMAND NAME]=[SUB COMMAND NAME]:[VALUE 1], [VALUE 2]...[VALUE N]
Receiving Events from the Avatar
The PRSONAS_AVATAR.exe sends commands in response to some queries using a web socket. The data packets are
delimited strings of properties. The default URL for the web socket server is ws://127.0.0.1:4443/Trigger. The packets
have the following structure:
STATUS|[COMMAND]=[VALUE 1], [VALUE 2]..[VALUE N]
Below is an example of a command being sent to the avatar using the default IP and port:
http://127.0.0.1:5553/sendKey/GETCAMERAPOSITION
Once the Avatar receives and processes the command it will broadcast the following string
over the websocket:
STATUS|CAMERAPOSITION=0.0,1.5,100.0
Below is a list of supported commands and events:
Play Animation
The Avatar allows for multiple means of triggering animations. Animations may be predefined in which
case only the animation ID is sent to the Avatar:

sendKey/HELLO_ANIMATION

The Avatar can also generate animations on the fly by supplying a text string after the | character. These
animations are "one shot" and will be discarded after they are rendered:

sendKey/|Hi! My name is Daphne!

Animations may also be cached and saved to an animation ID. So to save the above example to HELLO_ANIMATION
the command would look like:

sendKey/HELLO_ANIMATION|Hi! My name is Daphne!

After the animation is generated and saved to an ID it can be called without needing to specify the
text. So after sending the above command, a call such as:

sendKey/HELLO_ANIMAITON

Will render "Hi! My name is Daphne!"

Animations will also send CC and ENDCC event pairs over the websocket. The CC event will be sent right
before the charater begins to play the animation. The ENDCC event is called as soon as the animation stops
playing. Both events will return the text that was spoken by the Avatar.

The synthesized text parameter supports hexadecimal text encoding. This is useful if certain text characters
are preventing the animation from playing. When sending a hex-encoded string to synthesize an animation, use the
"ENC_" prefix. Hexadecimal encodind would be required, if for example, the text being sent to the Avatar contains
reserved delimiters (such as the | or ~ characters). So having the Avatar say "Hex encoding is needed for | and ~!"
the command would look like this:

sendKey/|ENC_48657820656E636F64696E67206973206E656564656420666F72207C20616E64207E21
Commands:
sendKey/[PREDEFINED ANIMATION ID]
sendKey/|[TEXT TO GENERATE SYNTHESIZED ANIMATION THAT WILL *NOT* BE CACHED]
sendKey/[ANIMATION ID OF THE SYNTHESIZED ANIMATION|[TEXT TO GENERATE SYNTHESIZED ANIMATION THAT WILL BE CACHED]
Responses:
CC|TEXT=[TEXT SPOKEN DURING PLAYBACK]
ENDCC|TEXT=[TEXT SPOKEN DURING PLAYBACK]
Get Camera Position
Command:
sendKey/CAMERA=GETCAMERAPOSITION
Response:
STATUS|CAMERAPOSITION=[CAMERA X LOCATION], [CAMERA Y LOCATION], [CAMERA Z LOCATION]
Set Camera Position
Command:
sendKey/CAMERA=SETCAMERAPOSITION:[CAMERA X LOCATION],[CAMERA Y LOCATION],[CAMERA Z LOCATION]
Response:
<no response is sent>
Get Camera Rotation
Command:
sendKey/CAMERA=GETCAMERAROTATION
Response:
STATUS|CAMERAROTATION=[CAMERA X AXIS],[CAMERA Y AXIS],[CAMERA Z AXIS]
Set Camera Rotation
Command:
sendKey/CAMERA=SETCAMERAROTATION:[CAMERA X AXIS],[CAMERA Y AXIS],[CAMERA Z AXIS]
Response:
<no response is sent>
Get Camera Field of View
Command:
sendKey/CAMERA=GETCAMERAFOV
Response:
STATUS|CAMERAFOV=[FIELD OF VIEW IN DEGREES]
Set Camera Field of View
Command:
sendKey/CAMERA=SETCAMERAFOV:[FOV VALUE]
Response:
<no response is sent>
Get Camera Avatar View
The Avatar view defines how the camera focuses on the Avatar relative to the
head and body of the character as well as the camera's zoom and X,Y offset.
Command:
sendKey/CAMERA=GETAVATARVIEW
Response:
STATUS|AVATARVIEW=[% FROM HEAD TO TOP OF AVATAR BOX], [% FROM BODY TO BOTTOM OF AVATAR BOX], [+ or - CAMERA SHIFT FROM CENTER OF CHARACTER], [CAMERA ZOOM VALUE]
Set Camera Avatar View
Command:
sendKey/CAMERA=SETAVATARVIEW:[HEADROOM], [BODYVIEW], [CENTERVIEW], [CAMERAZ]
Response:
<no response is sent>
Get Camera Avatar Box
The Avatar Box is a screen-space rectangle that the Avatar be rendered into.
This feature is useful for integrating into 2D user interfaces. The position
and dimensions of the box are expressed as a percentage of the width and height
of the screen and are normalized between 0 and 1.0. For example defining an
Avatar box using command sendKey/CAMERA=SETAVATARBOX:0.5,0.5,0.5,0.5 will render
the Avatar in a box lower right quarter of the screen.
Command:
sendKey/CAMERA=GETAVATARBOX
Response:
STATUS|AVATARBOX=[% SCREEN HEIGHT],[% SCREEB WIDTH],[% SCREEN WIDTH],[% SCREEN HEIGHT]
Set Camera Avatar Box
Command:
sendKey/CAMERA=SETAVATARBOX:[TOP % SCREEN HEIGHT], [LEFT % SCREEN WIDTH], [WIDTH % SCREEN WIDTH], [HEIGHT % SCREEN HEIGHT]
Response:
<no response is sent>
Shutdown the Avatar
Command:
sendKey/APP=QUIT
Response:
<no response is sent>
Get Current Character
This command deviates from the stanard send/receive process of the other
commands: the results of the commands are contained in the body of the response after
the GET call. The result JSON object with details about the currently displayed character.
Command:
CHARACTER/CURRENT
Response:
{
  "characterName": "[CHARACTER NAME]",
  "voiceCollectionName": "",
  "minCharRev": 0,
  "maxCharRev": 0,
  "description": "",
  "characterBundle":"",
  "controllerBundle": null,
  "meshObjectParameters": {},
  "speechSettings": {},
  "moodSettings": null,
  "moodBlendTime": 0.0,
  "logo": "",
  "encodedThumbnail": ""
}
Set Current Character
Command:
CHARACTER/SET=[CHARACTER NAME]
Response:
<no response is sent>
Set Language
This command sets the language of the text being sent to the Avatar.
Command:
sendKey/LANGUAGE=[ANSI LANGUAGE CODE]:S
Response:
<no response is sent>
Set Narrative Language
This command sets the language that the Avatar will respond in.
Command:
sendKey/NARRATIVE=[ANSI LANGUAGE CODE]
Response:
<no response is sent>